Sunday, July 20, 2008

Happy Birthday Mom


So this year for my mom's birthday I decided to do something special and make her a really nice cake. For some crazy reason I decided to tackle a multi layer cake from scratch with icing from scratch. Now, I have made a cake from scratch but it was a while ago and (surprisingly) a huge hit. So the pressure was on (at least in my head) to compete with my teenage self from years ago who had beginner's luck. Well, the problem was that the cake recipe that had been a hit had come in one of those seasonal recipe books that Pillsbury puts in the checkout aisle at the grocery store and it had gotten lost long ago. So I had to hunt for a new recipe. I ended up finding one in (of all places) the May 2008 issue of Every Day with Rachael Ray. The recipe is for a Golden Cake with Vanilla Frosting. I was a little nervous because this was the first 2 layer cake I have ever made and it was my first attempt at a butter cream icing (I made cream cheese icing last Thanksgiving). Luckily the recipe is really easy and it all turned out really well. I even picked up some gel icing tubes from the store to do a quick little decorating job. On that note, please don't judge me too harshly on the looks, remember it was my first cake and it is really hard to get the hang of those gel tubes at first. I really want to take the Wilton class, so this hopefully won't be my last cake and they will hopefully look much better from now on.


Golden Cake


Ingredients
2 3/4 cups flour
2 1/2 teaspoons baking powder
3/4 teaspoon salt
2 sticks (8 ounces) unsalted butter, at room temperature
2 cups sugar
5 large eggs
1 1/2 teaspoons pure vanilla extract
1 1/3 cups whole milk
Vanilla Frosting


Directions

Preheat the oven to 350°. Grease and flour two 9-inch round cake pans. In a medium bowl, whisk together the flour, baking powder and salt.

In a large bowl, using a mixer, beat the butter and sugar on medium speed until light and fluffy, 2 to 3 minutes. Scrape down the bowl. Add the eggs, one at a time, beating well after each addition. Beat in the vanilla. With the mixer on low speed, alternately add the dry ingredients and milk in three parts, mixing until just incorporated.

Divide the batter between the prepared pans and smooth the tops. Bake until a toothpick inserted in the center of each cake comes out clean, 35 to 40 minutes. Transfer the pans to a rack and let cool for 10 minutes. Run a knife around the pans to release the cakes and invert; let cool completely.4. Slice the cakes into 2 layers each. Stack and frost with the vanilla frosting.


Vanilla Frosting


Ingredients
2 1/2 sticks (10 ounces) unsalted butter, at room temperature
5 cups confectioners' sugar
1 tablespoon pure vanilla extract
1 to 2 tablespoons milk


Directions

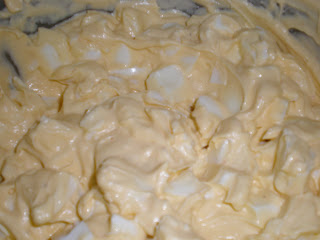
In a large bowl, using a mixer, beat the butter on medium speed until creamy, about 1 minute. Add the confectioners' sugar, 1 cup at a time, beating until smooth after each addition. Add the vanilla and 1 tablespoon milk. Beat at high speed until fluffy, adding an additional 1 tablespoon milk if necessary.

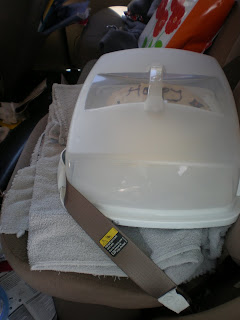
This was how I got the cake the 15 minutes from our house to my parents' house. I was so nervous the entire drive but it made it!

Cheesy Garlic Goodness


When I was younger my parents and I would drive 45 minutes north to the "big town" near us to go shopping and out to eat. One of the restaurants we would frequent was Red Lobster. Now, I've never been much of a seafood person (I blame this on living in a landlocked Midwestern state) but I loved to go to Red Lobster. Why did I, a seafood avoider, love to o there? The Cheddar Garlic Biscuits. I LOVE them. I could seriously just eat those while everyone else ate fish. So when a recipe for these biscuits popped up on the message board last year I was thrilled. Now I admit they don't taste exactly the same and they are made from Bisquick (which makes many foodies shudder), but they are incredibly yummy. I made them the other night with the Tomato and Mozzarella Pasta al Forno.


Cheddar Garlic Biscuits (aka The Red Lobster Biscuits)


2 cups Bisquick mix
1/2 cup shredded cheddar cheese
2/3 cup milk

1/2 teaspoon garlic powder
1/2 teaspoon parsley
1/4 cup butter - melted

Preheat oven to 450 F.
Combine first 3 ingredients until moist. Drop onto greased cookie sheet. Bake for 8 minutes, or until golden.
While the biscuits are baking, mix melted butter, parsley and garlic.
Pour over hot biscuits and serve.

Easy, Cheesy Pasta


One thing that you've probably noticed is that there are not a lot of real meals on here. I promise, we don't live on sweets alone. It is just that usually I feel like my meals are not that interesting or special. However, lately I have been trying to change that and make meals that are interesting, tasty, and not the same-old-thing. This is another recipe that I found on Annie's Eats. She says that it is a meal she enjoyed growing up and I can totally see why. It is a really easy cheesy pasta dish that is not too heavy. D gets tired of having the same heavy pasta dishes all of the time and he really seemed to enjoy this dish because he said it was not heavy (score one for me!). I had never worked with mozzarella in any form other than pre-shredded before and I found that I really liked it in block form. This meal came together pretty quickly and provided both of use with lunches for the next 2 days. I totally recommend this dish (thanks Annie!).


Tomato and Mozzarella Pasta al Forno


Annie credits this recipe to Pasta by Dorling Kindersley


Ingredients:

2 tbsp. extra virgin olive oil

2 garlic cloves, crushed

2-14 oz. cans diced Italian plum tomatoes

1 tsp. dried oregano

S&P

1 lb. pasta (tubes)

8 oz. mozzarella cheese, cubed

2/3 c. parmesan


Directions:

Heat oil in skillet. Add garlic and cook over medium high heat, 1 min. Add tomatoes and oregano and simmer rapidly, stirring occasionally until thickened, 15 min. Add S&P. Meanwhile, cook pasta. Toss pasta with sauce. Place half of pasta in an oiled 9×13” dish. Cover with half parmesan and half mozzarella. Top with remaining pasta, then parmesan and mozzarella. Bake at 400° for 15 minutes.

Peanut Butter Cookies


So in the never-ending quest for yummy cookies I have definitely been turning to my favorite blogs and hitting Google reader a lot. Recently I decided that we needed something to spice up our chocolate chip-snicker doodle routine and thought peanut butter cookies sounded really good. So I headed to my reader and found these awesome Peanut Butter Cookies on one of my favorite blogs, Annie's Eats. This is a recipe that she got out of the cookbook Baking: From My Home to Yours by Dorie Greenspan, which is a cookbook I really want to get. These cookies are really good and, even though my computer printed the recipe funny and it came out in 3 pages, they are really easy to make. I definitely recommend them. However, one thing I learned was that I really needed to ignore the baking time listed in the recipe and just watch them because the first batch got a little too dark in our gas oven.


Peanut Butter Crisscrosses

Found on Annie's Eats

From Baking: From My Home to Your by Dorie Greenspan

Ingredients:
2 ½ cups all-purpose flour
1 tsp. baking soda
½ tsp. baking powder
¼ tsp. salt
pinch of grated nutmeg
2 sticks (8 oz.) unsalted butter, at room temperature
1 cup peanut butter (crunchy or smooth)
1 cup packed light brown sugar
¾ cup sugar
2 large eggs
1 ½ cups chopped salted peanuts (I left these out)
about ½ cup sugar, for rolling

Directions:
Position the racks to divide the oven into thirds and preheat the oven to 350°. Line two baking sheets with parchment or silicone mats.

Whisk together the flour, baking soda, baking powder, salt and nutmeg.

Working with a stand mixer, fitted with a paddle attachment, beat the butter on medium speed for a minute or two, until smooth and creamy. Add the peanut butter and beat for another minute. Add the sugars and beat for 3 minutes more. Add the eggs one at a time, beating for 1 minute after each addition. Scrape down the sides and the bottom of the bowl and, on low speed, add the dry ingredients, mixing only until they just disappear. Mix in the chopped peanuts. You’ll have a soft, pliable (mushable, actually) dough.

Pour the ½ cup of sugar into a small bowl. Working with a level tablespoonful of dough for each cookie, roll the dough between your palms into balls and drop the balls, a couple at a time, into the sugar. Roll the balls around in the sugar to coat them, then place on the baking sheets, leaving 2 inches between them. Dip the tines of a fork in sugar and press the tines against each ball first in one direction and then in a perpendicular direction – you should have a flattened round of dough with crisscross indentations.

Bake for about 12 minutes, rotating the sheets from top to bottom and front to back at the midway point. When done, the cookies will be lightly colored and still a little soft. Let the cookies sit on the sheets for a minute before transferring them to cooling racks with a wide metal spatula. Cool to room temperature. (I ended up baking mine for about 9-10 minutes.)

Repeat with the remaining dough, making sure to cool the baking sheets between batches.

Saturday, July 19, 2008

Our Knives

So this is my first ever entry in a blogging event. Joelen is one of the people on the food board I go to and she also has an awesome blog and a cooking group in Chicago (check out Joelen's amazing blog). I'm really impressed by her because she has taken her love of being in the kitchen and is making it really work for her. With her cooking group she does different themed events and even includes bloggers so that people far away can get involved. So her most recent one is a blog roundup of knives to go along with a knife skills class she is teaching. I'm not sure why I decided to get involved with this particular event. I guess I see it as a good way to ease myself in, since I still get a little intimidated with all of the excellent cookers/bakers/bloggers out there. Or perhaps I really just wanted to expose you all to the crazy bunch of knives D and I work with. Seriously, they are the most mismatched, random group of things you will ever see. But we love (most) of them and use (most) of them. I have to say that D is way better with the knives than I am. We both worked in fast food (he was there longer than me) and while he learned some great skills I was (and still am) slightly afraid of them. But I'm working on it and will hopefully get better. So, let the knife tour begin.


So, first of all, this is our knife block. It is one of those cool ones that you can just randomly stick the knife into and the little plastic rods just move out of the way. This was a purchase D had to make after we moved because he knew it would come in handy. We got it at Linen 'n Things.


This is our favorite knife, it is a Santoku knife that we got at Target. We use this for everything it is the perfect weight, not too heavy or too lite. We use it to chop veggies and meats, it can seriously do practically everything.

This cleaver scares me. I have never used it, but D has. Ok, so I know that a knife should not scare me, but I feel like I don't have the skills to use it (maybe I could get Joelen to teach me). D uses this work cutting big pieces of meat, I think about using it as a weapon should the need ever arise (there, you have been warned). It came in a set of knives we picked up for cheap when we first moved in together.

And finally, this is our complete knife set. Well, actually it is multiple sets all stuck together. When we moved in together D brought some nice knives with him that his parents had saved (they are the ones with the wooden handle) and I had a really small set my parents sent with me (one of the black handled sets, the handles are plastic). Then we purchased the set that the cleaver came in (the other black handled set). That white knife in the front is just a little paring knife that came in this kitchen utensil set my parents gave us as well. And those little knives with the colored handles are from a paring knife set we bought at Linens 'n Things (that tiny little red knife didn't come with the set, I think it came here with D).

Well, there you have it. Those are the knives that make the food you see on this blog. They may not be the most expensive or the best made knives ever, but they work for use and we enjoy using them as we traverse the world that is cooking.

Again, this whole blogging event came from the genius that is Joelen. To see her blog, the post about this event, and the roundup after the deadline of midnight on July 20th, go to her blog.

Sunday, July 6, 2008

A Mother of all Challenges: Egg Salad

So one of the daunting tasks of getting married (in my opinion) is making the foods your spouse loves and grew up with. For us, one of the first foods of D's childhood I tried my hand at was his mom's deviled eggs. Hers are different than the ones I grew up with: my mom's are tangy while hers are sweet. So for Thanksgiving last year I decided to try her deviled eggs and, thank goodness, D and his mom and dad declared them satisfactory. But one thing that D's mom makes that I had never been willing to try was her egg salad, even though (as they frequently pointed out) it is the same exact recipe as her deviled eggs (which I love). But I recently saw a post on another blog for egg salad and it got me thinking about trying some. So, when D requested egg salad last night, I decided it was time. So today I made his mom's egg salad and, though D hasn't tasted it yet, I have and it tastes pretty darn good to me. This will definitely become a frequent meal this summer.

One of the things I love about this recipe (for deviled eggs or the egg salad) is that it is incredibly versatile and can be tweaked for your tastes and the amount you want to make. Today I made this with 9 eggs, but you can make as many as you want.


Egg Salad

Source: My mother-in-law

Ingredients

Eggs
Mayo
Miracle Whip
Your Favorite Brand of French Dressing OR BBQ Sauce
Pepper

The Recipe:
Eggs (I used 9)

Boil the eggs however you choose (We put them in a sauce pan, cover them with water, and then put them on medium-high heat on my gas stove for 20 minutes.)

Let the eggs cool completely

Cut the eggs, separate out the yolk, and cute the whites into small pieces and set aside in a bowl.
Place the egg yolks in a second bowl or food processor (I used the food processor)

Pulse yolks or smash with a fork until they are broken up into little pieces. Add to this a tablespoon of Mayo and one of Miracle Whip. Then add a small amount (roughly a teaspoon) of French Dressing or BBQ Sauce. Pulse or stir the mixture. Continue adding more Mayo and Miracle Whip and small amounts of the dressing or sauce until you reach the consistency you want. The thing to remember here is that the Mayo and Miracle Whip are basically just thinning out the mixture and providing the consistency, they aren't really adding any flavor. The flavor comes from the French Dressing or BBQ Sauce.

Add pepper to taste.

Pour the mixture over the egg whites and stir thoroughly. Allow to chill for at least an hour before eating. Goes great with homemade bread, toasted bread, or crackers.

Cinnamon Chip Blondies

So I get a lot of my recipes and inspiration from the What's Cooking Board and all the incredible girls there. I actually have a binder full of incredible recipes from the board and the blogs of the other members (that list to the right is full of links to all those great blogs: prepare to get hungry). So yesterday I promised D that I would bake something, but ended up getting distracted and most of the day got away from me. But not one to break a promise, I grabbed my trusty binder and started flipping. Toward the front of the sweets section (yes, I have so many that I have it divided) I came across one of the classic What's Cooking recipes: blondies. Now I've had blondies before but I have never actually made them myself. So I busted out my mixer and hit the pantry to see what I had to mix into the blondies and found that I still have a couple bags of Hershey's Cinnamon Chips. So I ended up throwing those into the mix, which I doubled to make a 9 x 13. This recipe is so simple it can be made really quickly, but it is so good you'll want to use it even if you have all day to bake!


Basic Blondies

Source: Now That's What's Cooking (Originally from Bakingblonde)


Ingredients:

8 T. butter, melted

1 c. brown sugar

1 egg

1 tsp. vanilla or 1/2 tsp. almond extract

pinch salt

1 c. flour

About 1 1/2 cups of Cinnamon Chips


Butter an 8x8" pan. Mix melted butter with brown sugar-beat until smooth. Beat in egg and then vanilla. Add salt, stir in flour. Mix in any additions (some ideas below). Pour into prepared pan. Bake at 350 degrees for 20-25 minutes (I ended up cooking my 9 x 13 pan for about 35-40 minutes)or until set in the middle. Cool on rack before cutting. I sprinkled some more cinnamon chips on top after I took them out of the oven but before they cooled, just to add a little more cinnamon flavor.


Add in ideas:

1/2 to 1 c. chocolate chips or butterscotch chips

1/2 tsp mint extract in addition to, or in the place of vanilla extract

1/2 c. chopped nuts, chopped up candy bars