Showing posts with label fruit. Show all posts

Tuesday, June 9, 2009

TWD: Parisian Apple Tart


This week's recipe was one I knew I had to make from the second I saw it. First of all, it's apples - which Doug and I both love. Second, it's an apple tart, which I've always wanted to make. Third, it is so incredibly easy to make and only required me to add one ingredient to my grocery list. And fourth (and most importantly), it was picked by one of my favorite people who just happens to run one of my favorite blogs (ever) and who also happens to be the main reason I am in TWD. So I knew this one had to be done.

And I have to say, Hornedfroggy/Jessica made an awesome pick here! This recipe comes together so quickly and tastes so incredibly good. I love how simple the ingredient list is, it's really a classic group of items, and it tastes so pure and good. I will definitely be making this again ---- actually I have already made it twice! I had a sheet of pastry left and some apples to use up, Doug didn't complain!

This was the first time I've ever used puff pastry and I was really happy to see that it's very simple to use (and I was really happy to find it here!!). I used one whole sheet and one whole apple on my first tart and thought it was really good. The second time I used one whole sheet of dough and two apples and it was really good, although just a little soggy.

So if you're looking for an easy and quick recipe that will really wow people, try this one. You will not be disappointed!

This recipe was picked by Jessica of My Baking Heart, check out her blog for the recipe (and then look at all the other incredible things she has done!) and check out all the TWD members to see how they tackled this one.

Parisian Apple Tart from Baking From My Home To Yours by Dorie Greenspan, page 319.

Tuesday, May 19, 2009

TWD: Fresh Mango Bread (with Strawberries)


I was a little hesitant about this week's recipe because I've never cut up a mango before. But luck was with me Saturday morning before I made this. We were watching Giada at Home and she  demonstrated how to cut a mango, what are the odds! So, using what I learned from my fav Italian chef, I tackled this recipe feeling fairly confident... and it turned out great! 

It was really easy to throw together, smelled awesome as it baked, and has a great taste. My only problem was that my mango didn't produce enough fruit for the whole recipe. I had read on the TWD site that this could happen so I got an extra mango and it still wasn't enough. So to try to keep this from getting too dry or boring I added in about a cup of diced strawberries, which taste awesome with the mangoes. I will definitely be trying this recipe again.

Kelly of Baking with the Boys picked this recipe, check out her blog for the recipe and all the awesome things she has made. And see how all the TWD bakers handled this one, it sounds like there are some interesting variations out there (I heard mention of some muffins and some bakers adding in chocolate chips).

Fresh Mango Bread from Baking from My Home to Yours by Dorie Greenspan, page 45.

Sunday, December 14, 2008

Banana Bread


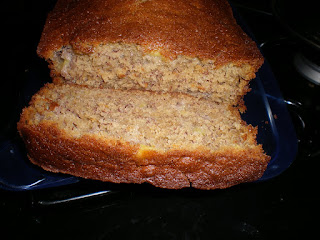
I love bananas in any form: bread, cake, muffins, peanut butter and banana sandwiches, and even just as a plain ole piece of fruit. So when my grandma had some extra bananas that were about to be too ripe to eat and she said I could have them I knew exactly what I was going to make. This has been my go-to recipe for banana bread for a couple of years now. It's actually a recipe for muffins but turns into a really nice loaf of bread. It gets a great color to it and is nice and dense with a great flavor.


The reason why I haven't blogged this before is that I don't have the original source for it. I printed it off probably two years ago, long before I started blogging or even really knew about food blogging. Therefore I didn't bother to write down where I got the recipe, I'm pretty sure that it never dawned on me that I would need to know where this came from. But this recipe is so great that I finally decided that I need (yes need) to share it with you all. There are requests for banana bread fairly frequently on the cooking board I frequent and I finally decided that I wanted to have this recipe where I could easily direct people to it. So, if this is your recipe, or you think you know where it came from, please let me know so I can give you credit. Enjoy! Edit: we have a source! One of the great girls on the cooking board found this recipe for me on the blog dinner a deux. Thanks!


Banana Muffins/Bread
From this blog
Recipe Adapted from a Giada De Laurentiis recipe

Makes 10-12 muffins or 1 Loaf

1.5 cups all-purpose flour

1/2 teaspoon baking soda

1/2 teaspoon salt

1/4 teaspoon baking powder

1/2 teaspoon ground cinnamon

1/2 teaspoon ground nutmeg

1 cup sugar

1/2 cup vegetable oil

2 eggs

1/2 tablespoon vanilla extract

2 ripe bananas, peeled and coarsely mashed

Whisk the flour, baking soda, salt, baking powder, cinnamon, and nutmeg in a medium bowl to blend. Beat the sugar, oil, eggs, and vanilla in a large bowl to blend. Stir in the banana. Add the dry ingredients and stir just until blended.* Divide the batter among the prepared muffin cups. Bake the muffins on the middle rack until the tops are golden brown and a tester inserted into the center comes out with no crumbs attached, about 25 minutes. Transfer the muffins to a rack and cool slightly, but eat warm. *I pour the batter into a greased loaf pan and bake for 30-40 minutes or until a toothpick comes out clean.

Sunday, November 30, 2008

A Nerve Wracking Addition to Thanksgiving

Have you ever tried to make something that you've never tried or even seen before? I hate cook books that don't have pictures because I like to see what items look like so I know if mine look right. Anyone else? Now, have you ever made something that you've never tried or seen before, but that a large portion of your perspective diners not only remember but remember as a major part of their childhood? Yeah, pretty nerve wracking.
This was what I faced preparing for Thanksgiving. For some idiotic reason, that I have since forgotten, I volunteered to make the cranberry sauce for our Thanksgiving celebration using my great grandmother's recipe. My mom, aunt, and grandmother all very clearly remember this recipe, they remember not only eating it but also helping to prepare it. Needless to say I was a little stressed out. And when Doug turned to me half way through the making of the sauce, when our poor tiny Cuisinart food processor was whining in complaint and the counters were covered in fruit, and asked "does this look right?" it dawned on me that I should stop volunteering to make things........ ok, not really. But it did dawn on me that I really did not want to mess this up. Luckily it was deemed acceptable, if not quite sweet enough, and people actually did eat it, although we have a decent amount left.

This actually wasn't too hard to make, and it would be a lot easier with a larger food processor, and is really good. Although it didn't end up being the only cranberry sauce on the table, you can't take away the canned stuff without warning, I think it was a hit. And I will definitely be trying some more of my great grandmother's recipes, hopefully in slightly less stressful situations.


Grandma's Cranberry Sauce
I don't know the original source on this, it's a very old family recipe

2 Apples
2 Oranges
1 Bag of Cranberries
Sugar to taste
Grind fruit (can use a food processor); mix in bowl and add sugar to taste.

Variations: To make Jell-o salad add above ingredients to one prepared box of cranberry Jell-o and allow to chill for at least 1 hour. I didn't do this but my mom says it is good.

Bringing the Cranberries to Thanksgiving


When my family has Thanksgiving you can be sure that there will be at least one pumpkin treat, if not more, and in recent years I've made sure that pecans are represented as well. So this year, when others beat me to the pumpkin and pecan items, I was at a loss for what to make. I kept finding great looking recipes, but they all featured one of the two items that were already going to be accounted for when our families gathered for our first joint family Thanksgiving at my parents' house. Then I had a flash of genius: cranberries! I was already going to be buying some for the cranberry sauce, so why not just grab an extra bag. Then I quickly remembered this awesome cranberry walnut bread recipe that I saw on Katie's blog and my dessert was born.

I think this bread was a nice alternative to the pies that were brought along to the party (and my goodness were there a lot of pies!). It was a bit of a lighter bite, with a nice fresh taste, courtesy of the orange zest and juice and cranberries. The walnuts were also a nice addition, even though I am not crazy about them. This would be a great item to bring in to a work party or a Christmas event as a nice alternative to the traditional dessert items of the season. And it's also a great item because it can be made a day or two ahead of when you need it and will be perfect, I made this Wednesday evening and it was perfect.


Cranberry Walnut Bread


Ingredients:
2 c. all purpose flour
1/2 c. granulated sugar
1 Tbsp baking powder
1/2 tsp salt
2 tsp grated orange zest
2/3 c. juice from an orange
2 eggs, lightly beaten
3 Tbsp unsalted butter, melted
1/2 c. shelled walnuts, coarsely chopped
1 1/4 c. fresh cranberries

Directions:
Preheat oven to 350 degrees and prepare a standard loaf pan.
In a small mixing bowl, combine orange juice, eggs, butter, and stir to combine thoroughly; set aside.
In large mixing bowl, sift together flour, sugar, baking powder, and salt.
Add orange zest and stir to combine.
Add wet ingredients to well in dry ingredients and mix until just combined (don't over mix).
Fold in walnuts and cranberries and transfer mixture to prepared loaf pan.
Place into oven and bake until knife inserted into center comes out clean, about 50-55 minutes.
Remove bread from oven and cool in pan for 15 minutes.
Remove from pan and cool completely on wire rack.
Wrap and put away for 1 to 2 days before serving.

Sunday, October 19, 2008

Apples Go Crunchy


Yes, another apple post. I promise though, this will be the last one (at least for a while). This is another recipe from Good Things Catered and another really quick, easy, and tasty item. When I made the apple cobbler Doug and I had a discussion on the difference between crumbles, cobblers, and crisps which lead to Doug requesting something crisp like. So at once I set upon the oh so arduous task of digging through all of the awesome blogs I read (you know how much I hate this task) until I found something that looked good. And let me tell you, this recipe looked good. It also looked quick and easy, two things I love to hear on a work night (I always still want to call them school nights, lol).

So I set about the kitchen whipping this up. I love that this recipe doesn't call for any random ingredients, it merely uses the basics that I always keep in the house. I also love it because it uses oats and I love pretty much anything with oats. I definitely recommend this treat for any night when your sweet tooth is hollering for something starring apple, you won't be disappointed.


Apple Crunch

Ingredients:
4 large apples
1/2 c. oats
1/2 c. packed brown sugar
1/4 c. whole wheat flour
4 Tbsp butter, cold
1 tsp cinnamon
1/4 tsp nutmeg
1/4 tsp vanilla

Directions:

Preheat oven to 375 degrees and spray an 8x8 baking dish with baking spray

Peel, core, and dice apples into 1/2-inch pieces-Spread apples evenly in baking dish.

In medium bowl, combine oats, brown sugar, flour, cinnamon and nutmeg

Cut butter into small pieces and add to dry ingredients along with the vanilla.

With pastry blender, cut butter into dry ingredients until all butter is about the size of a small pea.

Sprinkle this mixture evenly over apples.

Place baking dish in oven and bake for 55-60 minutes or until apples have cooked down and begun to caramelize.
Remove from oven and let cool for 10 minutes before serving.

The Next Spice Girl: Apple Spice


Continuing in this string of apple recipes (I told you we had a lot of apples, today I present apple spice cookie bars. These are incredibly good. As in, I could eat way too many of these at a time good. I found the recipe on Katie's Good Things Catered blog, which is where I've found a lot of the recipes currently living in my to-make pile. I've actually made these twice now and we've loved them both times. The fact that I've made them more than once should mean that I should have a better picture than this one, but I never have the mind to take a great picture when they are first done but I'm usually too busy thinking "smells good, looks good, want to eat." I hope to make them again so maybe the third time is a charm for picture taking.

These are incredible good and really simple to make. I've whipped them up in the evening after I've gotten home from work both times. They are also a great way to make your house smell good. Who needs candles when you can make apple spice cookie bars?


Apple Spice Cookie Bars

Ingredients:
2 c. plus 2 Tbsp all purpose flour
2 tsp baking powder
1/4 tsp salt
2 tsp ground cinnamon
1/8 tsp nutmeg
1/8 tsp allspice
small pinch ground cloves
1/2 c. butter, melted
1 c. packed brown sugar
1 c. white sugar
2 eggs
1 Tbsp vanilla extract
2 apples, cored and diced (a little less than 2 c.)
cinnamon sugar for sprinkling

Directions:

Preheat oven to 350 degrees and line 9x13 pan with foil and baking spray.

In medium bowl, combine flour, baking powder, salt, cinnamon, nutmeg, allspice, and cloves. Whisk to combine well and set aside.-In bowl of stand mixer, combine sugars and butter and beat on medium high until light and fluffy, about 1 minute.

Add eggs, one at a time, beating well to combine.

Add vanilla extract and beat to combine.

Turn mixer on slow and fold in flour mixture a little at a time until just combined.

Fold in apples.-Spread mixture evenly into prepared pan and sprinkle top generously with cinnamon sugar.

Place in oven and bake until cooked through, when top slightly bounces back to the touch, about 30 minutes.

Remove from oven and let cool completely before removing from pan, cutting and serving. (bars will be very soft)


Saturday, October 18, 2008

Apple Pie Goes Mini


So in the quest to finish off all of the million and one apples that have taken up residence in our kitchen, I have decided to spread my wings and test my boundaries. Thus, when Annie and Chelley posted recipes in their blogs for mini hand pies I was intrigued, especially by Chelley's apple pies. I was also slightly frightened, as I have never made a pie dough in my life. I'm not sure why that is, but I've never had the desire to try to best Pillsbury. But I recently decided to try to test myself in the kitchen and this seemed like a great way to do it. So last night while Doug was at work I set about the task of preparing the dough (with Chelley having told me it would be ok over night). I was actually really surprised at how easy this was. It takes a while, but most of that is just chill time for the dough and I never once felt frazzled. I was so excited when it was all ready and it "looked like a dough!" as I told anyone who would listen.

Today I attempted rolling out the dough, which is something I do not have a lot of experience with. And let me tell you, I definitely need some practice! I had a heck of a time rolling my dough out to the same thickness each time, but I finally got it to work. I broke open my 101 cookie cutter box for the first time to use the circular cutter to make the pies, which worked perfectly. I actually had fun filling these with the apple sugar mixture and sealing them up. I felt like Alton Brown making the decorative edges, using the egg wash and adding sanding sugar to the top.

These are absolutely awesome and I totally recommend making these. They take a while but they are totally worth it.

Chelley did a great job of describing the process of making these, so check out her blog.


Apple Hand Pies

I got it from Brown Eyed Baker

She adapted from Smitten Kitchen


For the pastry:

2½ cups all-purpose flour

½ teaspoon salt

16 tablespoons (2 sticks) unsalted butter, cut into pieces

½ cup sour cream4 teaspoons fresh lemon juice

½ cup ice water
For the Filling:

2 apples, peeled, cored and diced small

1/3 cup sugar
One egg yolk beaten with 2 tablespoons water (for egg wash)

Coarse sanding sugar, for decoration


1. To make the pastry, in a bowl, combine the flour and salt. Place the butter in another bowl. Place both bowls in the freezer for 1 hour. Remove the bowls from the freezer and make a well in the center of the flour. Add the butter to the well and, using a pastry blender, cut it in until the mixture resembles coarse meal. Make another well in the center. In a small bowl, whisk together the sour cream, lemon juice and water and add half of this mixture to the well. With your fingertips, mix in the liquid until large lumps form. Remove the large lumps and repeat with the remaining liquid and flour-butter mixture. Pat the lumps into a ball; do not overwork the dough. Cover with plastic wrap and refrigerate for 1 hour. If preparing ahead of time, the dough can be stored at this point for up to one month in the freezer.
2. Divide the refrigerated dough in half. On a lightly floured work surface, roll out one half of the dough to 1/8-inch thickness. Using a 4 1/2-inch-round biscuit cutter, cut seven circles out of the rolled dough. Transfer the circles to a parchment-lined baking sheet, and place in the refrigerator to chill for about 30 minutes. Repeat the rolling, cutting, and chilling process with the remaining half of dough. (I used a 4-inch cutter-if you can call a “cutter” the tin edge of the container that holds my smaller round cutters-and managed to get 12 from each dough half, after rerolling the scraps.)
3. Mix the diced apple with the sugar, and cook over low heat for 8-10 minutes, until the apples are tender. Set aside. Prior to preparing the pies, drain any accumulated liquid from the apples.
4. Remove the chilled dough from the refrigerator, and let stand at room temperature until just pliable, 2 to 3 minutes. Spoon about 1 to 2 tablespoons filling (use the smaller amount for a 4-inch circle) onto one half of each circle of dough. Quickly brush a little cold water around the circumference of the dough, and fold it in half so the other side comes down over the filling, creating a semicircle. Seal the hand pie, and make a decorative edge by pressing the edges of the dough together with the back of a fork. Repeat process with remaining dough. Place the hand pies back on the parchment-lined baking sheet, and return to the refrigerator to chill for another 30 minutes.
5. Heat oven to 375 degrees. Remove the chilled hand pies from the refrigerator, cut a small slit in each and lightly brush with the egg yolk wash. Sprinkle sanding sugar generously over the pies, and place pies in the oven to bake. Bake until the hand pies are golden brown and just slightly cracked, anywhere from 20 to 40 minutes, depending on how thick you rolled the dough. Remove the pies from the oven, and let stand to cool slightly before serving.

Saturday, October 4, 2008

My Very First From Scratch Apple Cobbler


That lovely creation up there is my very first from scratch apple cobbler. Now, I have made a few cobbler before that were very good, but they were all with the help of a mix. We live near an Amish community and have vacationed near some, so my mom and I have found many great Amish cobbler mixes over the years. However, I have been on a mission to make as many things from scratch as I can, I figure if I have the ability then why not? (Plus it has been a while since I've made it to an of the Amish stores.) So today I went hunting for a great looking apple cobbler recipe to use up some of the great apples my parents brought us from the local orchard. I also had a jar of this incredible apple cinnamon spread from a local baker that I wanted to use, and at my last job a girl who is related to the local baker brought in a cobbler made with this spread, so I knew I wanted to try that.


I looked at all the usual sites to try to find a recipe, but nothing jumped out at me. Then I remembered that back when we were in the middle of the peach frenzy I had printed out a peach cobbler recipe. So I found that recipe and started to tweak it to satisfy my apple needs. I've never really messed with a baking recipe before. No matter how often I play around in the kitchen while cooking I've always been afraid to do so while baking. In my mind there is just too big of a chance of me messing everything up, and that would make me very sad. But today I decided to be brave and make an attempt. I basically took the peach cobbler recipe and took all of the seasonings out of the recipe and replaced them with the apple cinnamon spread. Then I added some cinnamon to the topping batter before I put it on the apples. I also left off the cinnamon sugar topping that the original recipe called for. I thought it might be a bit too much, and I was going for a strong cinnamon flavor so I just added it to the topping. I was really nervous to try this but it came out great! The apples have a great cinnamon taste, not too sweet with a nice spice to them. I think I will make more of the topping next time, it did not completely cover the entire apple mixture, so I have a few gaps. But despite that fact I'm really please with my first attempt at making changes to a recipe, and I don't think I will be as worried next time.

I'm entering this into Joelen's Cobblers & Such blog event over at Joelen's Culinary Adventures. This will actually be my second time doing one of her events. Check out her blog to see all the great events she does.

Apple Cinnamon Cobbler Adapted from Kelly Cooks and Other Amazing Feats

6-8 medium sized apples of your choice - peeled, cored and sliced into thin wedges

1/4 cup white sugar

1/4 cup brown sugar

2 teaspoons cornstarch

3 tablespoons apple cinnamon spread


1 cup all-purpose flour

1/4 cup white sugar

1/4 cup brown sugar

1 teaspoon baking powder

1/2 teaspoon salt
1 tsp cinnamon

6 tablespoons unsalted butter, chilled and cut into small pieces

1/4 cup boiling water


Directions
- Preheat oven to 425 degrees F.- In a large bowl, combine apples, cup white sugar, cup brown sugar, spread, and cornstarch.
- Toss to coat evenly, and pour into a 9 x 13 pan
- Bake in preheated oven for 10 minutes.- Meanwhile, in a large bowl, combine flour, 1/4 cup white sugar, 1/4 cup brown sugar, baking powder, cinnamon, and salt.
- Blend in butter with your fingertips, or a pastry blender, until mixture resembles coarse meal. - Stir in water until just combined.- Remove apples from oven, and drop spoonfuls of topping over them.
- Bake until topping is golden, about 30 minutes. (Mine was only about 20 minutes)


Sunday, August 31, 2008

Fruit Crumb Bars


A few weeks ago these Blueberry Crumb Bars started popping up all over my Google Reader. Turns out they were originally posted on the Smitten Kitchen blog (which is a new love of mine). After seeing these in so many blogs I decided that I had to make them, and D quickly agreed. I whipped these up one night after work and they were incredibly easy to make. They turn out moist and delicious, especially with a dollop of whipped cream on top.

These were so good in fact that I decided I needed to use this recipe with different fruit, in the name of science of course, to see if they were as good without the lovely berries. Luckily, this opportunity game faster than I thought it would. One of the women I work with has a peach tree and it was producing gorgeous, juicy peaches faster than she and her family could eat them, so she started bringing big bags of them to work. I took a couple of bags of them: we froze some, are eating some whole, and some of them became a peach crumb. I cut the peaches into thin slices, covered them in sugar and let them sit for a few minutes while I made the crumb part of this recipe. To make the peach crumb I simply followed the blueberry recipe and substituted the peaches for the berries. Both of these are incredible and I totally recommend you try these (if you haven't already). I'm hoping to get my hands on some apples soon and try this again (all in the name of science, of course).


Blueberry Crumb Bars

1 cup white sugar
1 teaspoon baking powder
3 cups all-purpose flour
1 cup cold butter (2 sticks or 8 ounces)
1 egg
1/4 teaspoon salt
Zest and juice of one lemon
4 cups fresh blueberries
1/2 cup white sugar
4 teaspoons cornstarch

Preheat the oven to 375 degrees F. Grease a 9×13 inch pan.
In a medium bowl, stir together 1 cup sugar, 3 cups flour, and baking powder. Mix in salt and lemon zest. Use a fork or pastry cutter to blend in the butter and egg. Dough will be crumbly. Pat half of dough into the prepared pan.
In another bowl, stir together the sugar, cornstarch and lemon juice. Gently mix in the blueberries. Sprinkle the blueberry mixture evenly over the crust. Crumble remaining dough over the berry layer.
Bake in preheated oven for 45 minutes, or until top is slightly brown. Cool completely before cutting into squares.